本文主要是参看了掘金网的这篇文章后,对 ConstraintLayout 布局的一个补充说明。
1 Visibility behavior
ConstraintLayout 对可见行被标记为 GONE 的 View 有特殊的处理方式。下面来谈谈 android:layout_margin 和 app:layout_goneMargin 的区别:
1、android:layout_margin 一直有作用,即使目标 View 已经隐藏。
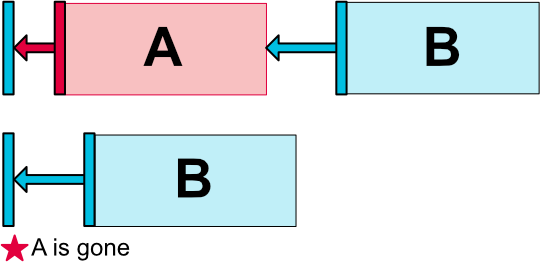
2、app:layout_goneMargin 只是在目标 View 隐藏时起作用。
同时声明时,后者的优先级大于前者。一般情况下会同时使用这两种属性以达到目标 View 不同显示状态下当前 View 的不同 Margin 效果。
2 Virtual Helpers objects
2.1 Barrier
Barrier,直译为障碍、屏障。在约束布局中,可以使用属性 constraint_referenced_ids 来引用多个带约束的组件,从而将它们看作一个整体。
1
2
3
4
5
6
7
8
9
10
11
12
13
14
15
16
17
18
19
20
21
22
23
24
25
26
27
28
29
| <Button
android:id="@+id/button1"
android:layout_width="wrap_content"
android:layout_height="100dp"
android:text="Button1"
app:layout_constraintLeft_toLeftOf="parent"
app:layout_constraintTop_toTopOf="parent" />
<Button
android:id="@+id/button2"
android:layout_width="wrap_content"
android:layout_height="200dp"
android:text="Button2"
app:layout_constraintLeft_toRightOf="@id/button1" />
<android.support.constraint.Barrier
android:id="@+id/barrier1"
android:layout_width="wrap_content"
android:layout_height="wrap_content"
app:barrierDirection="bottom"
app:constraint_referenced_ids="button1,button2" />
<TextView
android:id="@+id/bottom_textview"
android:layout_width="wrap_content"
android:layout_height="wrap_content"
android:text="stone"
app:layout_constraintLeft_toLeftOf="parent"
app:layout_constraintTop_toBottomOf="@id/barrier1" />
|
上面的 TextView 会在 button1 和 button2 这个整体的下面。如果将 app:constraint_referenced_ids=”button1, button2” 中的 button2 去掉,会发现,TextView 会仅在 button1 的下面。
2.2 Group
组的目的在于(且只能)同时控制多个控件的 Visibility 属性。但是有以下需要注意的地方。
1、单独设置组内控件的 Visibility 无效。
2、当有多个组引用了同一个 View ,该 View 的 Visible 属性由最后定义的组决定。
2.3 Layer(Added in 2.0)
同时需要对一组 View 做统一操作或者需要在 View 集合后面加个背景都可以。同时,他可以实现 Group 的功能。实例代码参考>>
2.4 Flow(Added in 2.0)
用引用的方式来避免布局嵌套,代替 LinearLayout 的功能。参考链接>>
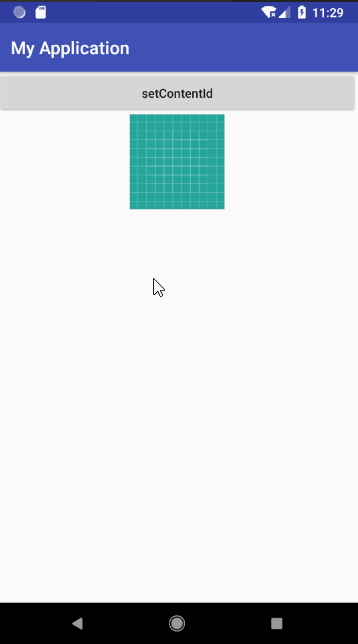
2.5 Placeholder
参考地址
Placeholder (占位符)用于和一个视图关联起来,通过 setContentId() 方法将占位符转换为指定的视图,即视图将在占位符所在位置上显示。当原视图已在 Placeholder 中显示时,原视图将从原有位置消失。
1
2
3
4
5
6
7
8
9
10
11
12
13
14
15
16
17
18
19
20
21
22
23
24
25
| <Button
android:id="@+id/btn_setContentId"
android:layout_width="match_parent"
android:layout_height="wrap_content"
android:onClick="setContentId"
android:text="setContentId"
android:textAllCaps="false" />
<ImageView
android:id="@+id/iv_target"
android:layout_width="wrap_content"
android:layout_height="wrap_content"
android:src="@drawable/ic_launcher_background"
app:layout_constraintEnd_toEndOf="parent"
app:layout_constraintStart_toStartOf="parent"
app:layout_constraintTop_toBottomOf="@id/btn_setContentId" />
<android.support.constraint.Placeholder
android:id="@+id/placeholder"
android:layout_width="wrap_content"
android:layout_height="wrap_content"
app:layout_constraintBottom_toBottomOf="parent"
app:layout_constraintEnd_toEndOf="parent"
app:layout_constraintStart_toStartOf="parent"
app:layout_constraintTop_toTopOf="parent" />
|
1
2
| Placeholder placeholder = findViewById(R.id.placeholder);
placeholder.setContentId(R.id.iv_target);
|
此外也可以直接在布局文件中将占位符和视图 ID 绑定在一起
1
2
3
4
5
6
7
8
9
| <android.support.constraint.Placeholder
android:id="@+id/placeholder"
android:layout_width="wrap_content"
android:layout_height="wrap_content"
app:content="@id/iv_target"
app:layout_constraintBottom_toBottomOf="parent"
app:layout_constraintEnd_toEndOf="parent"
app:layout_constraintStart_toStartOf="parent"
app:layout_constraintTop_toTopOf="parent" />
|
2.6 ConstrainSet
动态修改布局,参考链接>>
防止布局中有无 id 控件,可以设置 isForceId = false 。
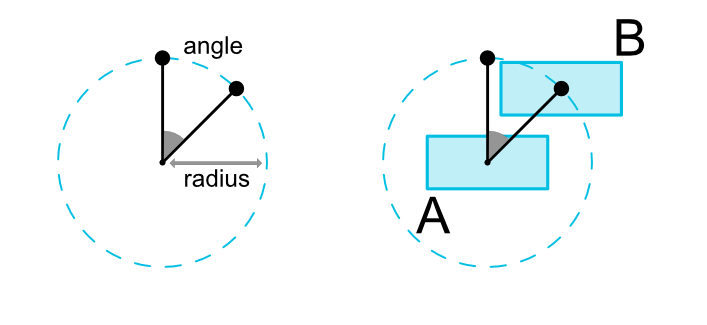
3 循环定位
一个小部件的中心可以以一定角度和距离限制相对于另一个小部件的中心。这允许你将一个小部件放在一个圆上。可以使用以下属性:
1、layout_constraintCircle :引用另一个小部件ID
2、layout_constraintCircleRadius :到其他小部件中心的距离
3、layout_constraintCircleAngle :小部件应处于的角度(度数,从0到360)
1
2
3
4
5
6
7
8
9
10
11
12
13
14
15
16
| <Button
android:id="@+id/bt_1"
android:layout_width="wrap_content"
android:layout_height="wrap_content"
app:layout_constraintBottom_toBottomOf="parent"
app:layout_constraintLeft_toLeftOf="parent"
app:layout_constraintRight_toRightOf="parent"
app:layout_constraintTop_toTopOf="parent" />
<Button
android:id="@+id/bt_2"
android:layout_width="wrap_content"
android:layout_height="wrap_content"
app:layout_constraintCircle="@+id/bt_1"
app:layout_constraintCircleAngle="45"
app:layout_constraintCircleRadius="100dp" />
|
4 其它
参考官方文档>>